Running a cblaster search using the search module
The cblaster search workflow
Both local and remote cblaster searches proceed through a similar workflow, which is depicted in the following figure:
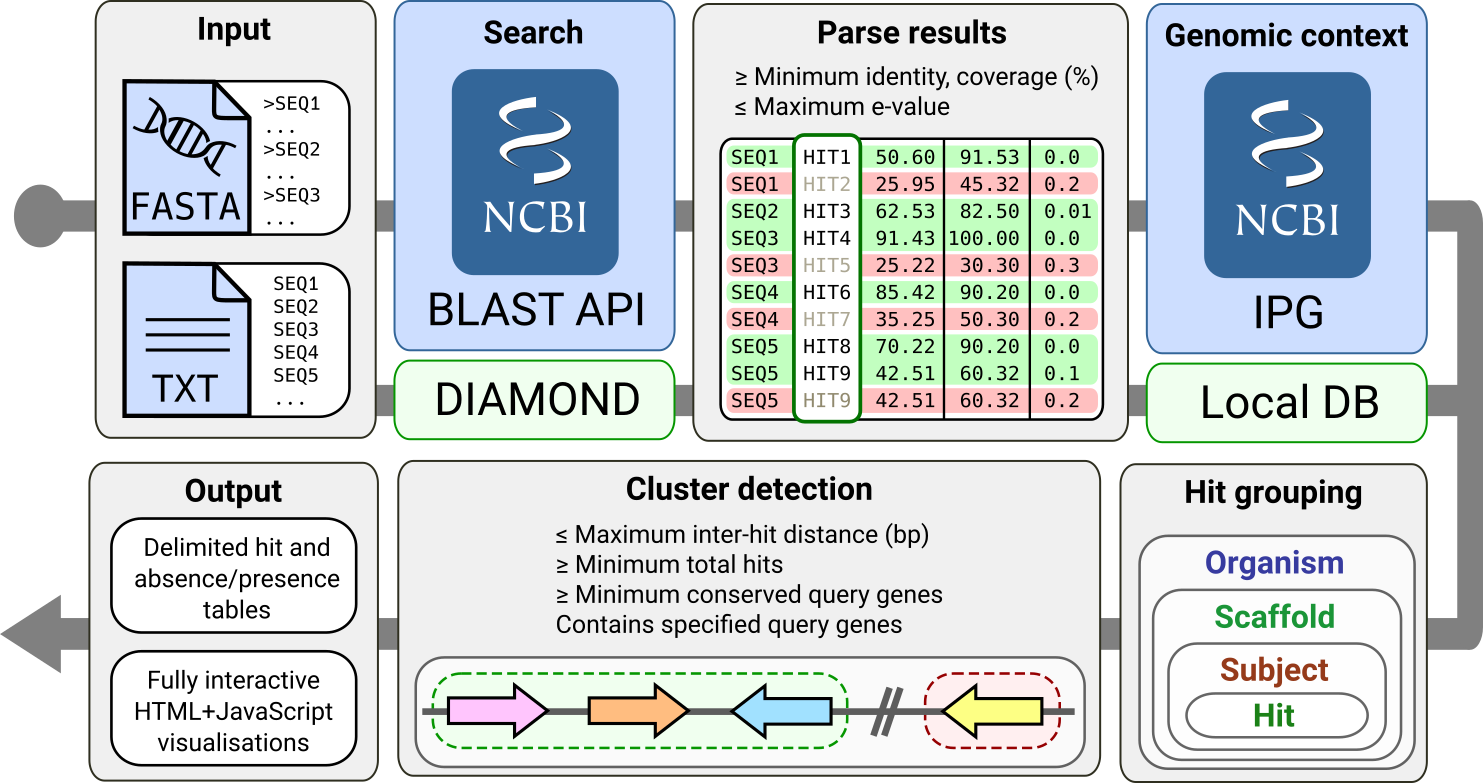
First, query sequences are searched against the NCBI’s BLAST API or a local DIAMOND database, in remote (blue background) and local (green background) modes, respectively. BLAST hits are filtered according to user defined quality thresholds.
In remote mode, each hit is then queried against the NCBI’s Identical Protein Groups (IPG) resource, which, as its name suggests, groups proteins sharing identical amino acid sequence as an anti-redundancy measure.
The resulting IPG table contains source genomic coordinates for each hit protein sequence, which cblaster uses to group them by their corresponding organism, scaffold and subject sequences.
In local mode, a special local database is created for this purpose (see Creating local sequence databases with the makedb module for more information).
Finally, cblaster scans the scaffolds on each organism for clustered BLAST hits and generates sumamry output tables and visualisations.
Warning
Before running a cblaster search, you must run the cblaster config
module to provide either an e-mail address or an NCBI API key. See
Pre-search configuration using the config module for how to do this.
In order to run a cblaster search, you will need to point the module to a collection of sequences to be used as queries.
These can be provided in two ways:
- A FASTA format file containing amino acid sequences
- A list of valid NCBI sequence identifiers (e.g. accession, GI number)
If using a FASTA file, it can be passed to cblaster using the -qf/--query_file argument:
$ cblaster search -qf myFile.fasta
Conversely, sequence identifiers are passed using the -qi/--query_ids argument.
These can either be given either in a newline-separated text file:
$ cat myFile.fasta
query1
query2
...
$ cblaster search -qi myFile.txt
Or directly to the command line:
$ cblaster search -qi query1 query2 ...
Coincidentally, both of the above commands are fully valid search commands, and will launch a remote search against the NCBI using the specified sequences. See Remote searches against NCBI sequence databases for more details on remote searches.
Searches against local sequence data
To run a local search, you will need to specify as such using the -m/--mode argument, as well as provide both a DIAMOND search database and a cblaster SQL database (see Creating local sequence databases with the makedb module for details on how to create these files).
However, only the DIAMOND database has to be specified in the command: cblaster will
automatically look for a SQL database with the same name and .sqlite3 suffix.
An example command might look like this:
$ cblaster search -m local -db myDB.dmnd -qf myFile.gbk
Functional domain searches using HMMER
To run a domain search, you need to specify the search mode as hmm, provide an array
of query Pfam domain profile names, a FASTA file containing sequences to be searched (produced using the
makedb module, see Creating local sequence databases with the makedb module for details) and the path to a folder
containing a copy of the Pfam database.
For example:
$ cblaster search -m hmm -qp PF00001 PF00002 -db myDb.fasta -pfam pfamFolder/
This will extract the specified domain profiles (PF00001 and PF00002) from
the Pfam database and search the sequences in myDb.fasta for any domain hits.
Note that like in local searches, cblaster expects an SQL database in the same
location as the FASTA file, with the same name and .sqlite3 suffix.
Additionally, cblaster requires two Pfam database files:
| Pfam-A.hmm.gz | Main database file containing HMM profiles |
| Pfam-A.hmm.dat.gz | File used for looking up domain families from query accessions |
The latest versions of these files are automatically downloaded when cblaster is
given the path to a folder which does not contain them.
Remote searches against NCBI sequence databases
Remote search is the default mode in cblaster.
As such, in the basic search example:
$ cblaster search -qf query.fasta
The sequences in query.fasta are loaded in and searched remotely.
cblaster provides several useful options specifically for remote searches.
By default, remote searches will be performed against the NCBI’s nr database.
Alternative databases can be specified using the -d/--database argument, for example:
$ cblaster search -qf query.fasta -db refseq_protein
cblaster currently only supports protein sequence searches using BLASTp, so you should choose protein sequence databases (e.g. nr, refseq_protein, swissprot, pdbaa).
If cblaster has been interrupted somehow during a remote search (i.e. search started but program is stopped before a session can be saved), it can be resumed using the Request Identifier (RID).
Every remote search is automatically assigned an RID which can be used to retrieve results up to 36 hours after they have completed.
This is reported to the screen when a cblaster search starts:
$ cblaster search -qf query.fasta
[13:43:16] INFO - Starting cblaster in remote mode
[13:43:16] INFO - Launching new search
[13:43:20] INFO - Request Identifier (RID): RAV3P2F3014
[13:43:20] INFO - Request Time Of Execution (RTOE): 13s
[13:43:33] INFO - Checking search status...
...
cblaster can resume a search from this RID using the --rid argument:
$ cblaster search -qf query.fasta --rid RAV3P2F3014
[13:56:21] INFO - Starting cblaster in remote mode
[13:56:21] INFO - Polling NCBI for completion status
[13:56:21] INFO - Checking search status...
[13:56:23] INFO - Search has completed successfully!
[13:56:23] INFO - Retrieving results for search RAV3P2F3014
...
Warning
The NCBI prioritises searches started through it’s interactive web interface over
searches launched via the BLAST API in cblaster. This means that, particularly
for searches that return a lot of results, searches can take a very long time to
complete (hours!). In this case, start a search using the BLAST website
(https://blast.ncbi.nlm.nih.gov), make a note of the RID, and pass that to
cblaster using the --rid argument, as well as the file containing your query
sequences using the -qf/--query_file argument.
Finally, NCBI allows for pre-filtering of search databases using NCBI Entrez search queries.
Entrez is the NCBI’s text search and retrieval system for all of the databases they provide.
The most obvious way to use this in cblaster is to filter based on specific taxonomic areas of interest to narrow down the result set.
This also has the added benefit of significantly reducing search run times.
For example, we can filter the nr database for only fungal sequences by providing an organism Entrez search term using the fungi NCBI taxonomy ID (4751) with the -eq/--entrez_query argument:
$ cblaster search -qf query.fasta -eq "txid4751[orgn]"
Note
It is best to ensure your search term is enclosed in speech marks such that cblaster reads it in correctly.
More help on building Entrez search queries can be found here.
Specifying filters
cblaster uses several filtering thresholds during the searching and clustering phases of its search workflow.
These are listed below:
| Argument | Description | Default |
|---|---|---|
-me/--max_evalue |
Max. E-value of a BLAST hit | 0.01 |
-mi/--min_identity |
Min. identity (%) | 30 |
-mc/--min_coverage |
Min. query coverage (%) | 50 |
-g/--gap |
Max. distance (bp) between any two hits in a cluster | 20000 |
-u/--unique |
Min. number of unique query sequences hit in a cluster | 3 |
-mh/--min_hits |
Min. number of total hits in a cluster | 3 |
-r/--require |
Query sequences that must be hit in a cluster |
The default values for each filter are pretty generous, and may need changing based on your data. The search thresholds should be fairly self explanatory; any hit not meeting them are discarded from the BLAST search results.
The clustering thresholds, however, are a bit more interesting.
These determine what conditions a candidate hit cluster must satisfy in order to be detected by cblaster.
The most important argument here is -g/--gap, which determines how far (in base pairs) any two hits in a cluster can be from one another.
This parameter could vary wildly based on your data set.
For example, in bacterial or fungal secondary metabolite gene clusters where genes are typically found very close together, a low value could be used.
Conversely, plant clusters, which may involve a collection of key genes spread out over the entire chromosome, would require a much higher value.
The gne module can used to calibrate this parameter based on your results, and is described further in Estimating genomic neighbourhood with the gne module.
The -u/--unique and -mh/--min_hits arguments deal with the number of hits within candidate clusters.
They differ in that -u/--unique looks for at least some number of your query sequences to be represented in given hit clusters, whereas -mh/--min_hits is only concerned with the total number of hits in the cluster, regardless of query sequence.
For example, if I have five query sequences and I specify -u 3, any clusters that do not have hits corresponding to at least three of my query sequences will be discarded.
However, if I have set -mh 3, any clusters that have less than three hits total in them will be discarded.
Finally, the -r/--require argument can be used to specify query sequences that must have hits in result clusters.
Using the above example, we could specify three query sequences:
$ cblaster search -qf query.fasta -r Seq1 Seq3 Seq5
In this example, any clusters not containing Seq1, Seq3 and Seq5 will be discarded.
Specifying output
cblaster offers several useful output options for searches.
By default, a complete summary is generated and printed to the terminal after the search has finished. This reports all clusters, as well as the scores and positions of each gene hit, found during the search, organised by the organisms and genomic scaffolds they belong to. For example:
Pyricularia oryzae
==================
CP034205.1
----------
Query  Subject     Identity  Coverage  E-value   Bitscore  Start    End      Strand
Seq1   QBZ57568.1  38.61     99.5235   0         2629      7879606  7891956  -
Seq2   QBZ57569.1  41.926    97.479    8.94e-90  285       7893739  7895354  -
Seq2   QBZ57572.1  32.979    98.324    3.97e-25  105       7900440  7901095  -
You can change how cblaster handles this output in several ways.
To save this output to a file, you can use the -o/--output argument.
The number of decimal places used in the score values can be changed using -odc/--output_decimals, and table headers can be hidden using -ohh/--output_hide_headers.
You can also generate a character delimited summary (instead of human-readable) using the -ode/--output_delimiter argument.
Throwing it all together, you could generate CSV file, with no headers and maximum 6 decimal places, and save it to a file like so:
$ cblaster search -qf query.fasta -o summary.csv -ode "," -ohh -odc 6
An easier way to digest all of the information that cblaster will produce is by using the binary table output.
This generates a matrix which shows the absence/presence of query sequence (columns) hits in each result cluster (rows).
For example:
Organism                           Scaffold        Start    End      BuaB  BuaC  BuaD  BuaE
Aspergillus alliaceus CBS 536.65   NW_022474703.1  15435    43018    1     1     1     1
Aspergillus alliaceus CBS 536.65   NW_022474686.1  272633   304495   0     1     1     0
Aspergillus alliaceus IBT 14317    ML735331.1      15828    43603    1     1     1     1
Aspergillus alliaceus IBT 14317    ML735238.1      264335   296204   0     1     1     0
Aspergillus mulundensis DSM 5745   NW_020797889.1  1717881  1745289  1     1     1     1
Aspergillus versicolor IMB17-055   MN395477.1      2742     27898    1     1     1     1
Aspergillus versicolor CBS 583.65  KV878126.1      3162095  3187090  1     1     1     1
As with the regular output, you can save the binary table to a file, as well as hide headers, change decimal places and delimiters using their respective -b/--binary arguments:
$ cblaster search -qf query.fasta -b binary.csv -bde "," -bhh -bdc 6
By default, the binary table will only report the total number of hits per query sequence in each cluster. However, you can instead change this to some value calculated from the actual scores of hits in the clusters.
This is controlled by two additional arguments: -bat/--binary_attribute, which determines which score attribute (‘identity’, ‘coverage’, ‘bitscore’ or ‘evalue’) to use when calculating cell values, and -bkey/--binary_key, which determines the function (‘len’, ‘max’, ‘sum’) applied to the score attribute.
Each cell in the matrix refers to multiple hit sequences within each cluster. For every cell, the chosen score attribute is extracted from each hit corresponding to that cell. Then, the key function is applied to the extracted scores. The ‘len’ function calculates the length of each score list - essentially just counting the number of hits in that cell. The ‘max’ and ‘sum’ functions calculate the maximum and sum of each score list, respectively.
For example, given a cell:
Query: Seq1
Hits: Seq2 (50% identity), Seq3 (70% identity)
By default, the cell value would be 2 (i.e. the count of hits in the cluster for Seq1). You could instead get the maximum identity value in the cell:
$ cblaster search -qf query.fasta -b binary.txt -bat identity -bkey max
…which would report 0.7, or the sum of all identities in the cell:
$ cblaster search -qf query.fasta -b binary.txt -bat identity -bkey sum
…which would report 1.2.
cblaster is capable of producing rich, interactive visualisations based on the binary table using the -p/--plot argument.
If no filename is provided to this argument, the plot will be served dynamically using Python’s built in HTTP server, and you will have to terminate cblaster manually via an interrupt (usually Ctrl+C).
If a filename is provided, cblaster will generate a static HTML file containing all of the necessary visualisation data and code, which can then be easily shared with other people.
Finally, cblaster allows you to save the raw BLAST and IPG tables downloaded from NCBI during a search, using the --blast_file and --ipg_file arguments, respectively.
Saving search sessions and recomputing outputs
Given that searches can take a significant time to run (i.e. as long as any normal batch BLAST job will take), cblaster is capable of saving a search session to file, and loading it back later for further filtering and visualisation.
As mentioned above, to save a search session, use the -s/--session argument:
$ cblaster search -qf query.fasta -s session.json
Once the session is saved, any subsequent runs with that session specified will make cblaster try to load it instead of performing a new search.
From here, you have a few cool options.
You can combine multiple session files (e.g. from local and remote searches) by providing more than one filename to the -s/--session argument:
$ cblaster search -s s1.json s2.json s3.json
[17:43:34] INFO - Loading session(s) [`s1.json', `s2.json', `s3.json']
...
Note
This requires each session file to correspond to the same query sequences; an error will be thrown if cblaster detects a mismatch.
You can recompute an old session using new filter thresholds to create a new session file:
$ cblaster search -s old.json -rcp new.json -g 40000 -mh 4
You can temporarily recompute (i.e. don’t save) to generate a new visualisation:
$ cblaster search -s session.json -rcp -g 40000 -mh 4 -p plot.html
Note
Filtering this way is not destructive (i.e. does not modify the original file); all data is loaded, filtered and recomputed within the program itself.
Finding intermediate genes between hits
The default output for cblaster is the cluster heatmap, which shows the absence or
presence of your query sequences. While we find this is generally the easiest way to
pick up on patterns of cluster conservation, we also like to be able to visualise our
results in their own genomic contexts so we can see the differences in gene order,
orientation, size and so on.
For this reason, we added integration to the clinker tool (https://github.com/gamcil/clinker),
which can generate highly interactive gene cluster comparison plots. However, in a
regular cblaster search, we do not have access to any information about the genes
between the BLAST hits shown in the heatmap. This means that if you were to run the
plot_clusters module on your session file
(see Plotting extracted clusters using plot_clusters),
you would produce a figure where most of the clusters are missing genes!
To get around this, you can use the -ig/--intermediate_genes argument when
performing a cblaster search. After the search has completed, genomic regions
corresponding to the detected gene clusters are retrieved from the NCBI, and used to
fill in the missing genes.
Note
If you forgot to use-ig/--intermediate_genesduring your search, don’t fret. You can also use it on an existing session file alongside the-rcp/--recomputeargument, to generate a new session file containing the missing genes. For example:
cblaster -s session.json -rcp new_session.json -ig
The intermediate genes feature has two other arguments:
| Argument | Description | Default |
|---|---|---|
-md/--max_distance |
The maximum distance between the start/end of a cluster and an intermediate gene | 5000bp |
--mic/--maximum_clusters |
The maximum amount of clusters to find intermediate genes for | 100 |
-md/--max-distance enables you to control how far cblaster will look for
intermediate genes. By default, it is set to 5000bp, which covers the main cluster
region (from the first hit to the last) plus some leeway on either side. Setting this to
a higher value will allow for a broader analysis of the genome neighbourhood of each
cluster.
-mic/--maximum_clusters controls how many clusters cblaster will attempt to find
intermediate genes for. As each cluster has to be queried against the NCBI individually,
this can take some time, so by default cblaster caps this at 100.